Database Administration using phpMyAdmin
Multithreaded JavaScript has been published with O'Reilly!Introduction
This document will cover various database administration activities using phpMyAdmin (PMA for short). This covers three levels of administration; database level, table level, and row (data) level. PMA is a database front end for the popular database language/architecture MySQL. PMA itself is written in the equally popular server-side language PHP.
You can also download a PDF of this tutorial.
Intended Audience
This document is written for either users with previous MySQL experience or users who need to modify data in a current program storing data in MySQL.
Requirements
In order to perform these activities you will need a working copy of phpMyAdmin along with permissions to use it (and a web browser). If you have a web host chances are this is accessible to you through a cPanel installation. Unfortunately, with most shared hosting systems using cPanel, PMA does not have the ability to work with MySQL on the database level, only table and row levels. In this case you will need to consult with documentation provided by your hosts.
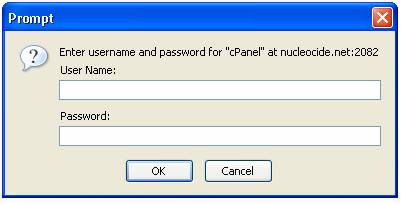
Logging in to phpMyAdmin
This step will be different for many installations. If this is done through shared hosting, you will need to log into your cPanel and then click the link that says phpMyAdmin. If you are working on a larger server, you will possibly have phpMyAdmin in a location such as /pma. Whoever installed the software on this server will be able to tell you what the URL for logging in would be.
Database level operations
Creating a database
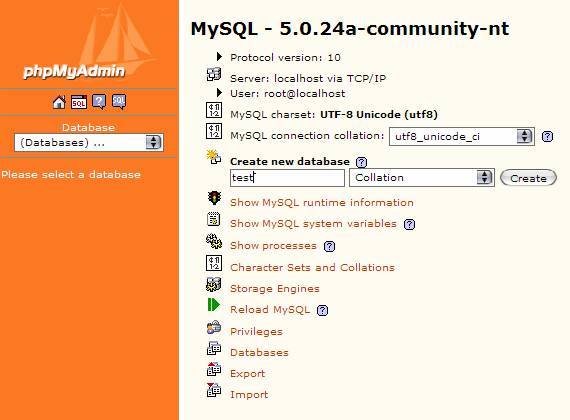
Log into your PMA account and the very first screen should look like Figure 2. Enter the name of the database you would like to create under the “Create new database” option.
Destroying a database:
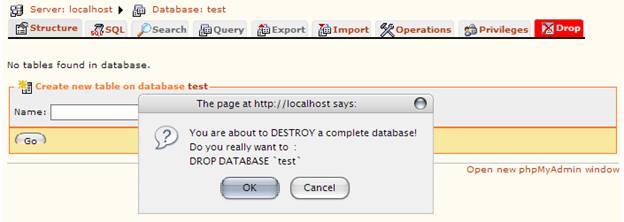
Destroying a database is just as easy as creating one. While viewing a database, click the Drop button in the toolbar (Refer to figure 3). This will bring up a prompt confirming that you would like to remove the database. Destroying a database will also destroy all data in that database and this is completely undoable.
Copying or renaming a database:
If you need to copy all tables and rows in a database, or simply rename the database, this can be done by clicking the operations tab while looking at the database. This will bring up a screen with various actions that can be performed on the database. Either enter in the name you would like to have the database renamed to or a name to have the database copied to and press Go.
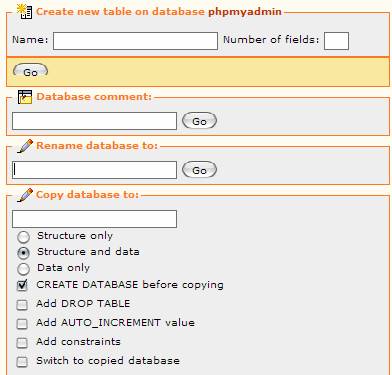
Table level operations
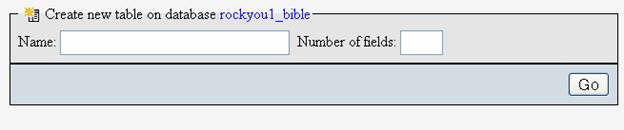
Creating a table
The form that is used to create a new table is in the structure view of the database in which you want to add the table to (Click the structure button while viewing a database). Here you must specify the number of fields (columns) in your database along with a name for the table.
Once you enter in this information and press “Go”, you will be taken to a screen (Figure 6) where you can input specific details about each column.
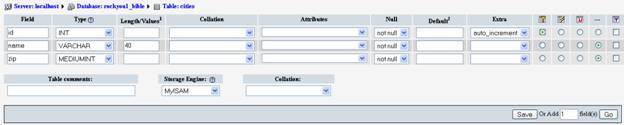
If you decide you need to add another column, press ‘Go’, or if you are satisfied with your table layout, press Save. If PMA decides your table doesn’t follow proper database guidelines, it will prompt you to fix something before allowing you to set these changes. This will bring you to the table structure page (Figure 7).
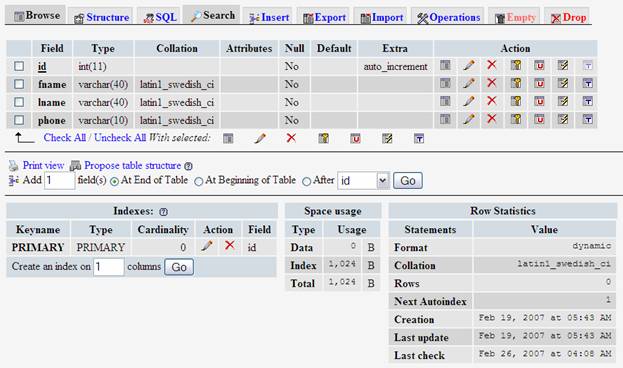
Destroying a table
While in the table structure view (Figure 7), click the drop button in the toolbar. This will bring up a prompt asking you if you’re sure you want to do this.
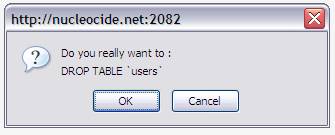
Make sure your dropping a sample table (and not a production payroll table) and press OK.
Copying a table
Click the Operations button in the toolbar while viewing the table. This will bring up the operations page with many useful actions that can be performed at the table level.
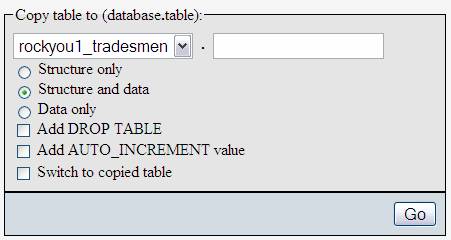
Here you can copy the table to the same database or another one. If you would like to copy the data to another table you must have created it first. Leaving the default values will allow the data to be copied properly. In the empty text field you can specify the name of the table you are copying to. PMA will switch to the copied table.
Renaming a table
Click the Operations button in the. The option to rename a table is in the options fieldset.
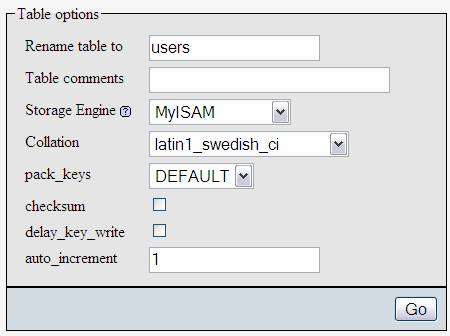
Set the name of the table you would like this table to have in the first field, and leave everything else as it is. Pressing Go will perform the table rename and PMA will switch over to the newly named table.
Row Level Operations
Inserting a row
Click on the insert tab while looking at the table you would like to insert a row into.
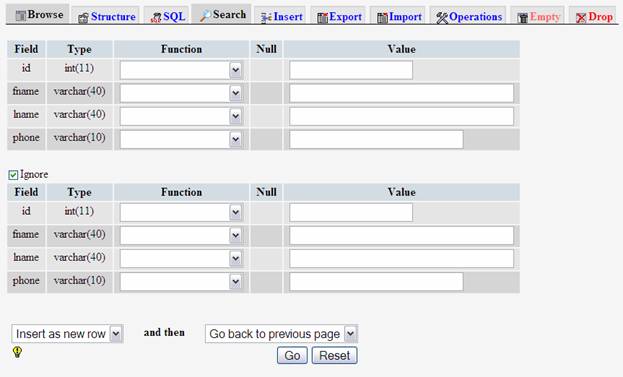
Fields are automatically generated for each column of data in your table. The field type is shown to remind you of what kind of data the column accepts. The function field offers various functions that can be applied to your data before being inserted into the row. If you set the function to MD5, for example, the text you input would be encrypted using the MD5 algorithm. If you are inserting normal data none of the functions will need to be used.
TIP: if you are using auto-increment indexes (like in this example) you can skip entering information for that field. MySQL will automatically enter the next available increment number.
There are two forms on this page as you can insert two rows of data at the same time. If you only want to insert one row, don’t enter any data into the second form. If you are entering a lot of information, use both forms and select “insert another new row” from the dropdown near the bottom of the page. This will bring you to the insert screen again instead of going to the table browse page.
Updating a row
First click the browse button in the toolbar of the table that you would like to update information. This will bring up the browse screen:
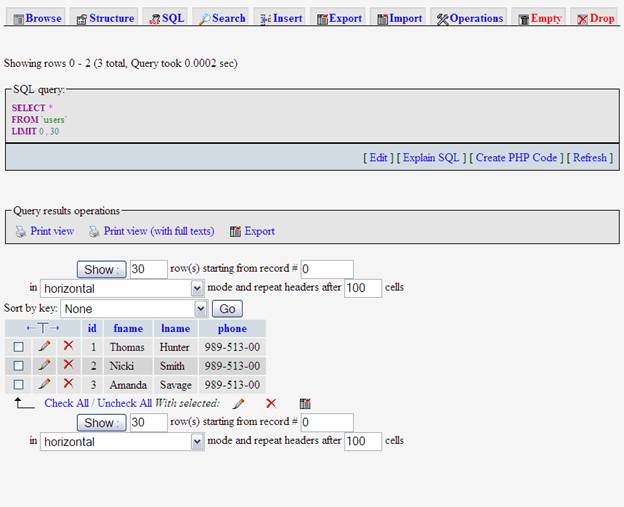
The table near the bottom displays the information in the database and by default is limited to showing 30 rows. Click the [pencil] icon next to the row and this will bring up Figure 13.
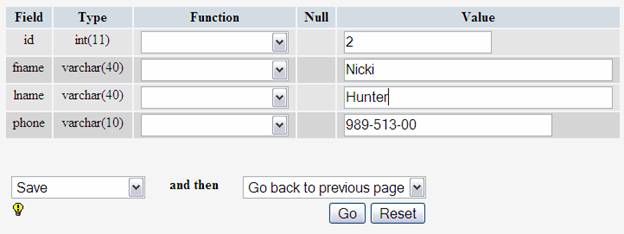
TIP: If you would like to update several rows at once, click the check boxes next to the rows and select the pencil icon below the table.
Here you can set the new information for that row. If you plan on cycling through the database and modifying each row of data, click the edit next row option of the dropdown box. This will only work if you have auto-increments set on the table.
Pressing Go will commit the changes and bring you back to the table browse screen.
Deleting a row
While in the table browse window, click the [X] symbol next to the row. This will bring up a popup asking if you are sure you would like to do this.
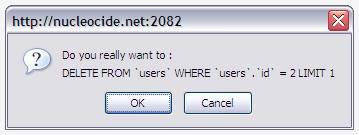
Press OK and the row will be deleted. This will bring you back to the table browse screen (Figure 12).
Conclusion
These are elementary database administration tasks that can be performed using phpMyAdmin. Having a firm understanding of PMA and its layout scheme can only improve one’s understanding of MySQL as a language.
Thomas has contributed to dozens of enterprise Node.js services and has worked for a company dedicated to securing Node.js. He has spoken at several conferences on Node.js and JavaScript and is an O'Reilly published author.