FL Studio Comprehensive Mixer Interface Overview
Multithreaded JavaScript has been published with O'Reilly!The FL Studio Mixer is the place where you add effects to your different audio clips or sound generators. You can load FL Studio formatted effects (which provide more interaction with the FL Studio host) or you can open VST plugins (which are more common but provide less interaction).
This tutorial describes every facet of the mixer, graphically and conceptually.
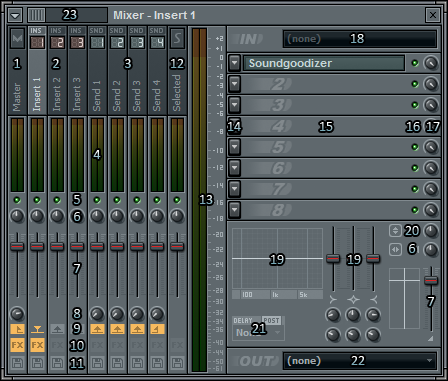
- Master Mixer Channel – All other channels are eventually routed into this one. Any mastering effects should be applied on this channel.
- Mixer Channels – These are your mixer channels. You are given a maximum of 64 of them to play with. Why 64? It’s a computer thing. Selecting a channel changes most other things on the mixer as all the things displayed (minus the mixer listing) are related to this specific mixer channel.
- Send Channels – You are also given four send channels. These are always visible as you scroll through the list of channels. These are great for applying one common effect (such as a reverb or delay) in one location instead of many (the less delay effects you load, the more efficient FL will run).
- Channel Volume Meter – This displays the volume level at a given time for the channel. This is useful for finding which channel is clipping.
- Channel Mute – Clicking and dimming this item will mute the channel.
- Channel Pan – Changing this will alter the balance of the channel.
- Channel Volume Adjust – This slider adjusts the channel volume.
- Channel Send Volume – To use this, click the channel send icon (9) and rotate the knob to a desired volume level.
- Channel Send Enable – Clicking this enables the output of one channel to be sent to another channel.
- Channel Effects – This lights up if a channel has items loaded into the eight racks. This is a good way of telling which channels you’re using or not.
- Render Channel Audio to Disk – Clicking this will allow you to export a single track to disk. This is useful if you are sending audio tracks to a buddy to remix.
- Selected Channel – This applies the effects you enable to the selected channel. A good way to see how certain effects will sound.
- dB Meter – This displays the audio levels in dB for the selected track. This is useful for looking for clipping or rudeness.
- FX Slot Options – Useful for selecting the FX VST or moving the position in the FX chain up and down. To select which plugin to add at the selected FX slot, click the ‘Select’ option. If you have recently installed a new plugin and it is not in the list yet, click ‘(More)’ from the sub menu.
- Selected FX Plugin – This gives you the name of the FX you have added. If you click the name it will make the plugin active.
- FX Enabler – Enables or Disables the plugin.
- FX Volume – Sets volume level for plugin. Muting this is different than disabling (16)!
- Chain Input – Useful if you are using a microphone compatible with the ASIO drivers.
- Mini EQ – Each channel has a mini EQ attached to it. Personally I would recommend using a higher quality EQ as one of the FX slots.
- Stereo Separation – Provides a simple stereo separator. I would recommend using a better one in the FX slots.
- Delay – Provides a simple delay effect. I would recommend using a better one in an FX slot.
- Output – Useful for ReWiring FL Studio with another application.
- Mixer Scroller – If you are using a lot of channels and your mixer window is small (like with this tiny screenshot) you may want to scroll through them horizontally to see the rest of them.
How to use the send options to send mixer output to another channel:
First, select the channel you want to send output from (E.G. Insert 3).
Second, click the channel send enable (9) for that channel. The knob above it will appear and you can set the volume. Note that by default every channel sends to the master channel and the four send channels with zero volume.
You will usually want to disable the master channel from receiving output from your channel if you want it to go through another one first.
Thomas has contributed to dozens of enterprise Node.js services and has worked for a company dedicated to securing Node.js. He has spoken at several conferences on Node.js and JavaScript and is an O'Reilly published author.