How Cobalt Calibur uses Canvas to display Sprite-Based Graphics
Multithreaded JavaScript has been published with O'Reilly!Hi, I'm Thomas Hunter, creator of Cobalt Calibur, an HTML5 multiplayer game. I'm here to tell you about how I used the new HTML5 canvas API to provide visuals using sprite-based graphics. This is similar to how old game consoles such as the NES drew graphics. You are likely familiar with using Sprite Sheets with CSS for reducing bandwidth, and the same magic can be used when drawing canvas graphics and animations.
I'll be embedding gist's in this document so you can see the code, but if you'd like to see all of the code, check out the Cobalt Calibur engine.js file.
Overview
When building animations and game engines, you'll usually find that there is a single primary loop which draws the screen every cycle. Each one of these cycles represents a frame of the animation. Sometimes there are hard limits to the framerate, such as 60 frames per second. Othertimes, the limit is uncapped and it runs as fast as possible. With Cobalt Calibur, we redraw frames every 150ms, or approx 6.66 frames per second. Here's the relevant code:
var currentFrame = 0;
setInterval(function() {
  currentFrame++;
  if (currentFrame % 3 == 0) {
    currentFrame = 0;
    // redraw every 150 ms, but change animation every 450 ms
    app.graphics.globalAnimationFrame = !app.graphics.globalAnimationFrame;
    app.player.killIfNpcNearby();
  }
  app.environment.map.render(currentFrame === 0);
}, 150);
The way the looping is done in Cobalt Calibur is actually incorrect. That loop will run even when the current tab isn't focused, causing the screen to be needlessly redrawn. Modern browsers have something called requestAnimationFrame(), which works better. Due to some issues with keybindings and player movements right now, using that function results in glitchy redraws. Once the player movement is fixed, using requestAnimationFrame() will be the perfect solution, as it was designed to be used for this very purpose.
Viewport vs World Overview
The way Cobalt Calibur (and most RPG's) work is that there is a giant playing field, but you are only seeing a small part of it at a time. We call the part of the playing field that you can see the viewport, similar to how the visible portion of a webpage is called a viewport. The viewport for Cobalt Calibur is dynamically resized when the game first loads. We take the width and height of the browser viewport, divide it by the width and height of tiles (to figure out how many we can fit), and round down. Ideally, we could keep track of each time the browser is resized, recalculate the number, and rebuild the canvas object (it would make a great pull-request ;). Heres the code used by the viewport:
initialize: function() {
  var view = app.graphics.viewport;
  view.WIDTH_TILE = Math.floor($(window).width() / app.graphics.TILE_WIDTH_PIXEL);
  view.HEIGHT_TILE = Math.floor($(window).height() / app.graphics.TILE_HEIGHT_PIXEL);
  view.WIDTH_PIXEL = app.graphics.viewport.WIDTH_TILE * app.graphics.TILE_WIDTH_PIXEL;
  view.HEIGHT_PIXEL = app.graphics.viewport.HEIGHT_TILE * app.graphics.TILE_HEIGHT_PIXEL;
  view.PLAYER_OFFSET_TOP_TILE = Math.floor(view.HEIGHT_TILE / 2);
  view.PLAYER_OFFSET_LEFT_TILE = Math.floor(view.WIDTH_TILE / 2) + 1;
  $('#gamefield').append('<canvas id="map" width="' + view.WIDTH_PIXEL + '" height="' + view.HEIGHT_PIXEL + '"></canvas>');
  $('#page, #nametags').width(view.WIDTH_PIXEL).height(view.HEIGHT_PIXEL);

  app.graphics.$canvas = $('#map');
  app.graphics.handle = document.getElementById('map').getContext('2d');
}
Each time we draw the screen, we calculate which tiles of the overall map will be visible, so that if the player has moved around, their new location is drawn. We also loop through all of the players and NPCs and draw them as well.
Basic Canvas Drawing
The way canvas drawing works is that once a graphic is drawn to the canvas, it is there forever. Luckily, you can draw graphics over top and the old ones go away. We start by drawing the terrain, then we draw the ‘corruption' blocks (which are alpha-transparent solid colors), then we draw the NPCs and players (which are transparent PNGs) above the terrain. Most graphics are all the same size, 32×32 pixels. However, characters are 32×48 pixels (just to make things interesting). By drawing characters from the top of the screen to the bottom of the screen, we ensure that ‘foreground' characters properly overlap ‘background' characters.
The drawing functions are quite simple. Here's an example of the tile drawing code. The API for this really reminds me of PHP's GD library. Some notes, the app.graphics.tilesets.terrain object contains a bunch of information about different terrain types. The drawImage() function is the meat and potatoes of this code. It takes the source terrain image, drawing it to the canvas. Its arguments relate to source width, height, X, Y positions, as well as canvas width, height, X, Y positions. You can draw images bigger or smaller than they are in your source document doing this.
function drawTile(x, y, tile) {
  var x_pixel = x * app.graphics.TILE_WIDTH_PIXEL;
  var y_pixel = y * app.graphics.TILE_HEIGHT_PIXEL;

  if (tile == null || isNaN(tile[0])) {
    return;
  }

  app.graphics.handle.drawImage(
    app.graphics.tilesets.terrain,
    0,
    tile[0] * app.graphics.TILE_HEIGHT_PIXEL,
    app.graphics.TILE_WIDTH_PIXEL,
    app.graphics.TILE_HEIGHT_PIXEL,
    x_pixel,
    y_pixel,
    app.graphics.TILE_WIDTH_PIXEL,
    app.graphics.TILE_HEIGHT_PIXEL
  );
}
Lots of Array Operations
Like the old game consoles the canvas tag emulates, Cobalt Calibur makes use of a lot of array operations. We are constantly looping through the big map array to find tiles to be drawn, along with an array of characters and NPCs and corruption data to be displayed. One example of interesting array stuff includes NPC direction drawing. The tileset (below), devotes each row to a single character. There are four sets of images, South, East, North, West. Each set contains three frames of animation, an at-rest state (unused), an odd movement frame, and an even movement frame.
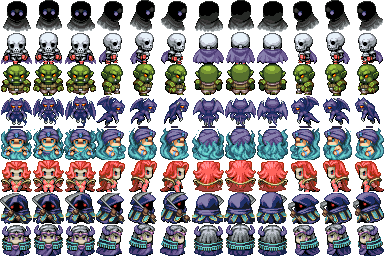
If you remember from the master redraw loop above, we do some frame checking every few cycles. We do this so that we can flip the animation state of characters. By having this even/odd state global between all players/NCPs, we save on some CPU cycles. If you check out a game like Final Fantasy Legend for the Gameboy, you'll see that characters were drawn this way. It's also silly looking, as all players and NPCs are constantly ‘wiggling', even when in a state of rest. Ideally, Cobalt Calibur would draw animations when players and NPCs move, so that they could be in between tiles for a moment. During this animation state they could be animated, then using the at-rest frame when just standing (another great pull request hint).
Here's the code we use for drawing avatars. Notice how the function needs to know if this is a character (because they are slightly taller and need to be drawn upwards). Also notice the code we use for mapping their position. In the case of the NPC image above, if we want to draw a skeleton, he's in the second row, which begins 32px down from the top. If he's facing north, we know his image is in the third group. We then check the global animation frame and know which frame of animation to use from which group.
var len = app.players.data.length;
for (var k = 0; k < len; k++) {
  var player = app.players.data[k];
  if (player.x == mapX && player.y == mapY) {
    var index = app.graphics.getAvatarFrame(player.direction, app.graphics.globalAnimationFrame);

    var player_name = player.name || '???';
    var picture_id = player.picture;
    if (isNaN(picture_id)) {
        picture_id = 0;
    }
    if (redrawNametags) app.graphics.nametags.add(player.name, i, j, false);
    app.graphics.drawAvatar(i, j, index, picture_id, 'characters');
  }
}

// app.graphics.drawAvatar:
function drawAvatar(x, y, tile_x, tile_y, tileset) {
  var x_pixel = x * app.graphics.TILE_WIDTH_PIXEL;
  var y_pixel = y * app.graphics.TILE_HEIGHT_PIXEL;
  var tile_height = 32;

  if (tileset == 'monsters') {
    tileset = app.graphics.tilesets.monsters;
    tile_height = 32;
  } else if (tileset == 'characters') {
    tileset = app.graphics.tilesets.characters;
    y_pixel -= 16;
    tile_height = 48;
  }
  app.graphics.handle.drawImage(
    tileset,
    tile_x * app.graphics.TILE_WIDTH_PIXEL,
    tile_y * tile_height,
    app.graphics.TILE_WIDTH_PIXEL,
    tile_height,
    x_pixel,
    y_pixel,
    app.graphics.TILE_WIDTH_PIXEL,
    tile_height
  );
}
Drawing Simple Rectangles
With each new frame being drawn, we first turn everything black. This operation is slightly expensive (isn't everything?) A lot of games don't do this though. Think back to when you used to play Doom, and you would cheat and disable clipping, and you could walk through walls. Then everything beyond the edges of the map would start to show artifacts of the last thing that was rendered. We get the exact same thing in Cobalt Calibur when the player approaches the edge of the map. The player would see the tile adjacent to the edge of the world outside of the world. By drawing this black rectangle each render, this doesn't happen.
function render(redrawNametags) {
  // immediately draw canvas as black
  app.graphics.handle.fillStyle = "rgb(0,0,0)";
  app.graphics.handle.fillRect(0, 0, app.graphics.viewport.WIDTH_PIXEL, app.graphics.viewport.HEIGHT_PIXEL);

  var i, j;
  var mapX = 0;
  var mapY = 0;
  var tile;
  if (redrawNametags) app.graphics.nametags.hide();
  // ...
}
Also, above, you can see the simple syntax for drawing rectangles. You first set the color you want to draw, and second you actually draw the rectangle by providing the origin and the width and height (in this case, we start at 0,0 and draw the entire size of the viewport). Note that swapping colors takes CPU, so if you are going to do a lot of work with similar colors, try to draw everything with one color, then switch colors and do it again. The syntax for the color should look familiar; it is the CSS rgb() code. Note that you can also use the rgba() syntax as well (which is what we do for daylight and corruptions). Daylight is also a giant rectangle taking up the entire screen, and it is either dark orange or dark blue or just dark.
Layers
As for drawing the nametags above players and NPCs, I took the easy way out and rendered them in the DOM instead of on the canvas. I figured it would be easier to control them this way, and possibly faster to render. The nametag element floats above the canvas, and the nametag offsets are set so they go below the character. The chat box, inventory, and item controls are all also a normal part of the DOM.
There's nothing wrong with taking a layered approach to your game. It sometimes makes sense to use a canvas for the background, a canvas for players and NPCs, a canvas for foreground environment items, and even a layer for a HUD. Imagine if a character moves around a lot, and their health never changes. You don't want to redraw their health graph every single time your environment updates, that would be a lot of wasted rendering.
Conclusion
This was a high level overview of how Cobalt Calibur draws its canvas graphics. If you want to get into the nitty gritty, please check out the engine.js file. Feel free to use as many of these principles in your next game development project as you can. The project is released under a dual GPL/BSD license, so you can even take some of the code and reuse it.
There's a lot more to the game than just the canvas drawing, it also uses the new HTML5 audio tag, some jQuery promise/defer functions, and everybody's favorite, websockets. And, if you're a JavaScript programmer looking for an easy (and powerful) way to begin server-side programming, the backend is written in Node.js.
Thomas has contributed to dozens of enterprise Node.js services and has worked for a company dedicated to securing Node.js. He has spoken at several conferences on Node.js and JavaScript and is an O'Reilly published author.