FL Studio Interface Overview
Support this website by purchasing prints of my photographs! Check them out here.So, you've just gotten your hands on a shiny new version of FL Studio and you want to learn the ins and outs of it. FL, despite popular belief, is a very powerful (yet easy to use) DAW (Digital Audio Workstation). Just because it it more affordable than others doesn't mean that it comes up short.
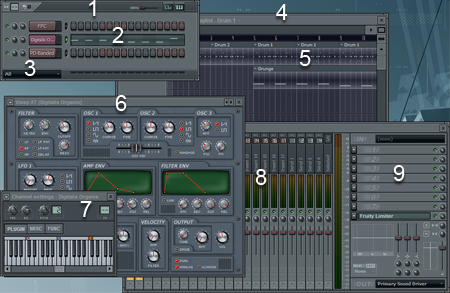
The first thing to understand is the interface. This is an example interface of a simple project I was playing with. This interface doesn't explain the toolbars or the browser panel which is usually on the left side of the screen.

- Instruments Panel – This may not be the technical name however the panel obviously is missing a title. This panel shows all the assets that belong to the project, including instrument VSTs, soundclips, and automations.
- When a particular channel is selected which contains notes, they are displayed next to the instruments being triggered.
- Project assets become categoriezed and by using the black dropdown box you can select categories to view.
- Playlist – This contains multiple patterns, soundclips, and automations which make up your entire track.
- Here you can see three patterns. The rows that audio gets triggered on does not matter, they can even overlap. In the first row I place all drums (for my convenience). On the second row I have a simple riff.
- Here is a sample VST instrument.
- This is FL's interface to the VST instrument and contains configurable information, such as what mixer track the audio is being sent to.
- These are mixer tracks that your audio is being sent through. FL offers 64 mixer tracks.
- Each mixer track has a series of 8 chains. Each chain link contains a VST effect which audio comes in the top and out the bottom tot he next VST effect.
This is a brief overview and will be beefed up as demanded.